/
Sharing a Google Calendar
Sharing a Google Calendar
Here is a tutorial on how to share your calendar with someone else.
Getting to the Sharing Settings
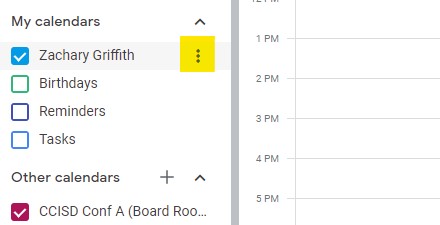
- In your calendars page, go to the name of the calendar you wish to share on the left.
- Hover over that name and 3 dots will appear to the right of it. Click on that.
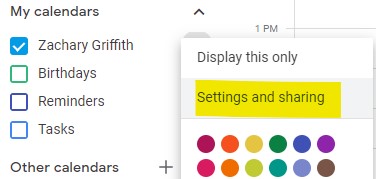
- In that menu, click on "Settings and Sharing".
- You will now be in a window for changing sharing settings for that calendar
Sharing Settings Screen Description
There are many things you can do on this screen, so here are some details of different parts:
Global Sharing Options
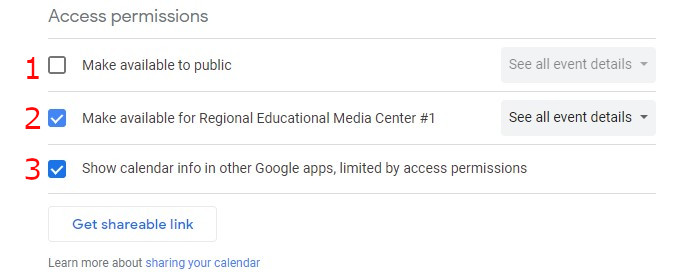
The Access Permissions setting controls large scale calendar access. The picture below is labelled to match each following numbered line
- You can choose to share with the general public. This will allow anyone in the world to see your calendar, so decide whether you want that before doing it.
- "See only free/busy" allows anyone on the web to see the calendar but with no details outside of if you are marked busy or free during that block.
- "See all event detail" allows anyone on the web to see the full details of all calendar events inluding: time, location, invited people, google meet id, etc.
- You can also choose to share it with everyone in your organization. This allows everyone in your organization to view it, including Students if you're an educational institution.
- "See only free/busy" allows organization users to see the calendar but with no details outside of if you are marked busy or free during that block.
- "See all event detail" allows organization users to see the full details of all calendar events inluding: time, location, invited people, google meet id, etc.
- "Make changes to events" allows organization users to make changes to the details of events (this setting may not be available depending on your organizations settings)
- "Make changes to events and manage sharing" allows organization users to make changes to the details of events as well as manage who has access to the calendar.
- Allows other Google applications such as Gmail access calendar info within the current sharing permissions
Share With Specific People
This section allows you to share your calendar out to individuals.
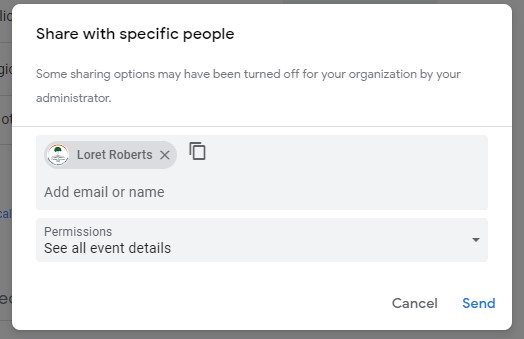
- Click "Add People" to select users to share the calendar with
- This opens a box with two fields.
- "Add Email or Name" is the field to select users. If the user exists in your domain or contacts, it may show up after you type the email or name partially.
- The Permissions field sets the level of access
- "See only free/busy" allows selected users to see the calendar but with no details outside of if you are marked busy or free during that block.
- "See all event detail" allows selected users to see the full details of all calendar events inluding: time, location, invited people, google meet id, etc.
- "Make changes to events" allows selected users to make changes to the details of events (this setting may not be available depending on your organizations settings)
- "Make changes to events and manage sharing" allows selected users to make changes to the details of events as well as manage who has access to the calendar.
- Once a user has been added, you can modify their level of access at any time using the dropbox next to their name.
, multiple selections available,
Related content
Adding a Shared Google Calendar
Adding a Shared Google Calendar
More like this
Google Calendar
Google Calendar
More like this
Embedding a Google Calendar
Embedding a Google Calendar
More like this
Creating a New Calendar
Creating a New Calendar
More like this
Creating a Public Calendar
Creating a Public Calendar
More like this
Create Appointment Schedule
Create Appointment Schedule
More like this


