Rise Vision is presentation software for digital signage.
| Table of Contents |
|---|
Making a Presentation (licensed)
- Go to http://apps.risevision.com and log in.
- Click Add Presentation +
Choose a template. If Presentation in the upper left and Select to Add from Template - Please note that templates are only available to licensed users (yes even the Google Slides and Blank templates). Choose a template and design! There are hundreds of templates to choose from, but the licensed version also gives you the tools needed to design your perfect presentation.
- If you're going to import a Google Slides Presentation, choose Blank (refer to section below).choose Google Slides Full Presentation and add your URL. Again, this feature does not work for free and unlicensed displays.
- Name it something descriptive, then click Apply.When done editing, click Save. The presentation should now be published. If it is not, hit Publish.
Using a Google
...
Slides Presentation (free and unlicensed)
- Go to http://apps.risevision.com and log in.
- Open the Google Slides Presentation you'd like to use
- Click File > Publish To Web... > Embed
- Make sure the settings look like this (you can change the Auto-advance slide time to whatever you'd like, within reason)
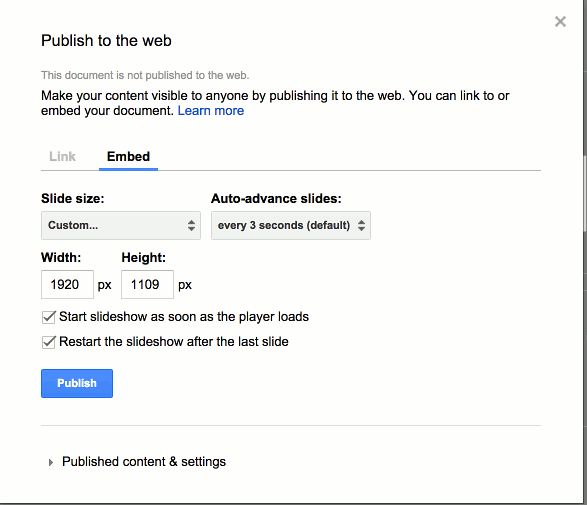 Copy the URL within the embedded link and ensure that both boxes are checked to start the slideshow immediately and to restart the slideshow once complete. See below for an example.
.png?version=1&modificationDate=1617962979000&cacheVersion=1&api=v2&width=600)
- Click Publish.
- In a new tab, follow steps 1 - 3 from above.
- Click View HTML </>
- Go back to the Google Slides presentation and copy the contents of the entire box. Now go back to the Rise Vision tab and completely replace "THIS IS THE PART YOU PUT THE GOOGLE SLIDES LINK" with the copied Google Slides Link.
- Click Save. The presentation should now be published. If it is not, hit Publish.
Replace everything in the editor with this:
| Code Block | ||
|---|---|---|
| ||
<!DOCTYPE HTML PUBLIC "-//W3C//DTD HTML 4.01 Transitional//EN">
<html>
	<head>
		<meta http-equiv="content-type" content="text/html; charset=UTF-8">
		<title></title>
	</head>

	<body style="width:1920px;height:1080px; margin: 0; overflow: hidden;" ></body>
  	<center>
    	THIS IS THE PART YOU PUT THE GOOGLE SLIDES LINK
  	</center>

<!-- Warning - Editing the Presentation Data Object incorrectly may result in the Presentation not functioning correctly -->
	<script language="javascript">
	<!--
	var presentationData = {
	"presentationData": {
		"id": "261b03a9-fee7-4c7a-a9bd-25b560b0d283",
		"hidePointer": true,
		"donePlaceholder": "",
		"placeholders": []
	}
};
	//-->
	</script>
<!-- No scripts after this point -->
</html> |

|
V

Making Schedules
...
- NOTE: if you add a presentation via URL, you'll want to add /embed?start=true&loop=true&delayms=10000 to the end of the url (in place of /edit) in order to get the slideshow playing automatically and advancing on its own. This sets it at 10 seconds per slide, but can be adjusted by changing 10,000 to a different number. A thousand equals 1 second, etc.
...
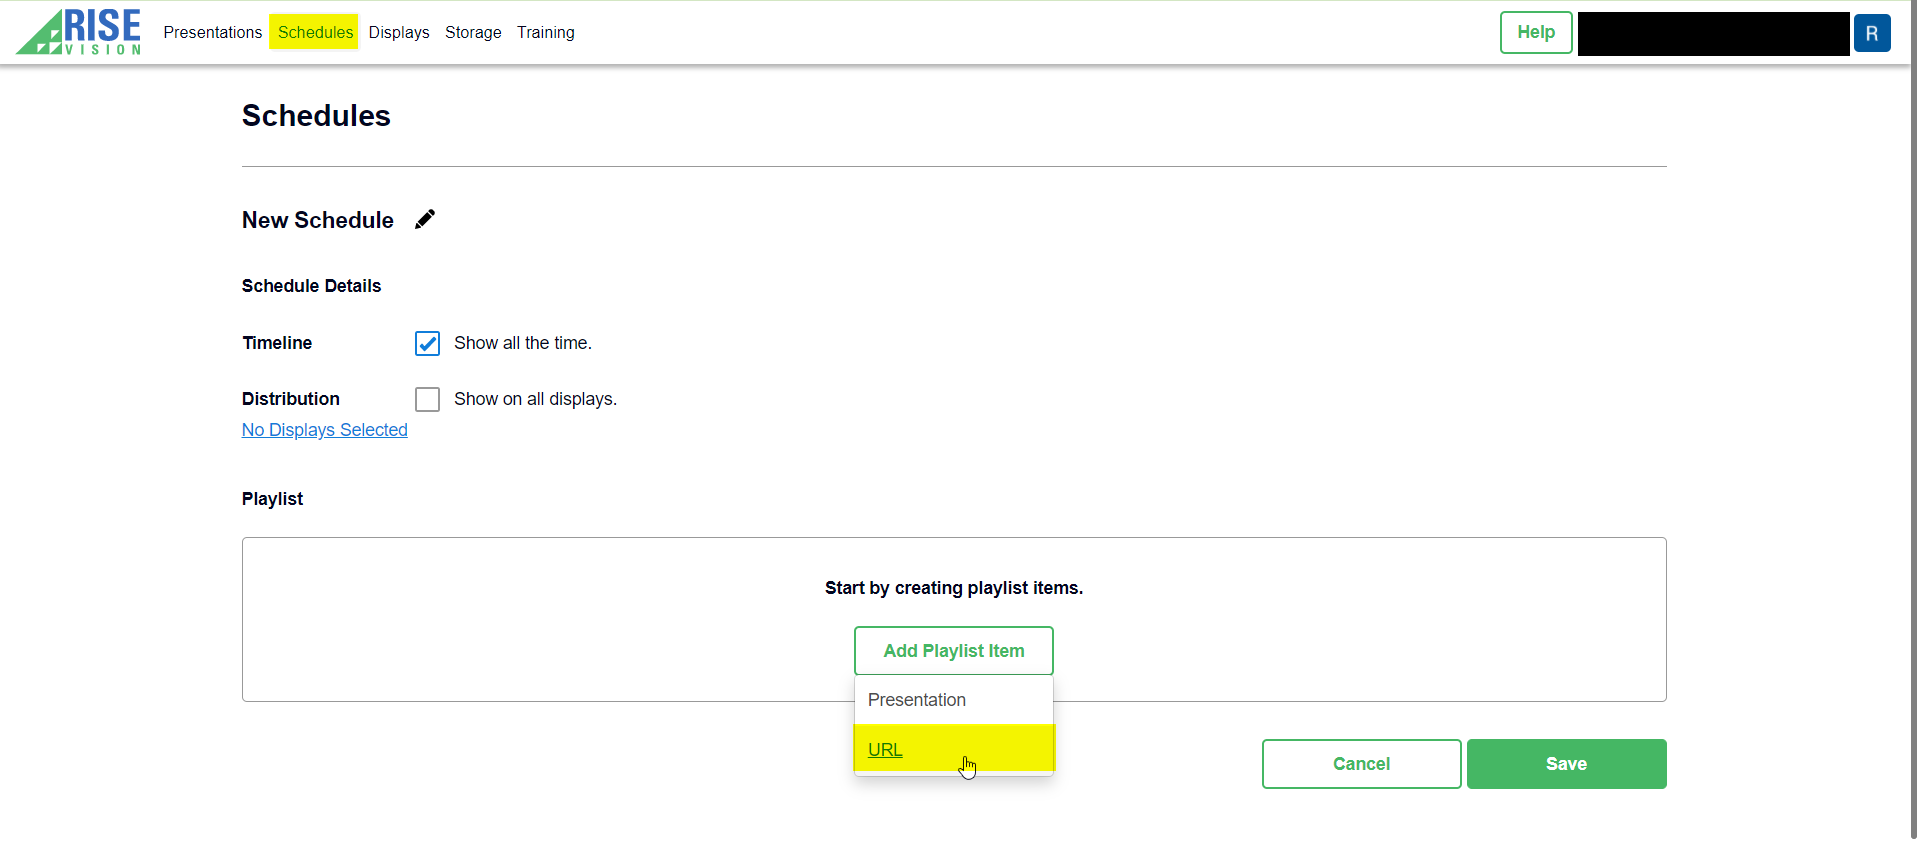
Add the Presentation to a Schedule
- Open the Schedule tab and select to Add Schedule
- Name the Schedule something useful. Also select the appropriate boxes for when and where to display the schedule.
- Choose to add a Playlist item. For licensed users, you can add a previously created "Presentation". For free and unlicensed users, select URL and paste in the link to the presentation.
Put your Schedule on a Display
- Open up the Displays tab and select the display of your choice.
- Under the Schedule section on the Displays page, you can select a schedule from the dropdown box. Choose the appropriate schedule and Save.
- If you run into difficulties, you can choose to restart the RisePlayer or Media Player. You can also add a new display here.
- For licensed users, this is where you can select to apply a license to your display. You can also get a sneak peak at your presentation, set a daily reboot timer, and view other information.